I saw multiple people are struggling to integrate the TestNG Tests with the TestRail and it becomes even more complex when we start using the @DataProvides in TestNG and then update the Results in the TestRail. So I decided to write and create a step by step complete guide with an example of how we can use @DataProvider and normal @Test and update the results using the TestNG Listeners. As we all know the TestRail is a web-based test case management software to store, manage, track & run test cases. I have already written the short article about the quick integration which you can find here.
Note: This article is more focused on the @DataProvider based Tests and Results but can be used for the simple Tests as well with out any changes.
Create an Annotation for holding TestRail TestCase Id
The first step is to create a simple Annotation class which can be used for holding the TestRail Id and which can be easily and added to any of the Tests. As per the Oracle
Annotations, a form of metadata, provide data about a program that is not part of the program itself. Annotations have no direct effect on the operation of the code they annotate.
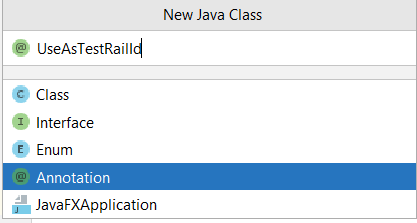
In IntelliJ, you can simply create an annotation as a Java Class
You can use any name for the Class and Test Rail id Variable like below.
@Retention(RetentionPolicy.RUNTIME)
@Target(ElementType.METHOD)
public @interface UseAsTestRailId
{
    int testRailId() default 0;
    String[] tags() default "";
}
Download the TestRail API Client
The API binding for Java can be used to access TestRail’s API from Java and Java-based languages. It provides the basic functionality to authenticate API requests, provides seamless JSON and UTF-8 encoding/decoding, and has generic support for reading and write requests. You can visit the Test Rail URL to download the Client. Open the URL and Please download the API binding client and place it into your Project.
As to update results and interact with the TestRail we are going to use the API client, So no need to create anything special and just copy-paste the Class APIClient.java in your directory.
Create TestNG Listener
We need to build a custom TestNG listener which ensures that it can differentiate between ordinary tests and data-driven tests and post the results accordingly after the execution. This Listener is important as it has all the logic regarding what is the Test status and Getting the TestRail Id and then API calls to Update the Result.
For data-driven tests, they would need to keep track of all the iterations that have run so far and then update the results for each iteration.
public class TestNgTestRailListener implements IInvokedMethodListener {

    @Override
    public void afterInvocation(IInvokedMethod method, ITestResult testResult) {
        UseAsTestRailId useAsTestRailId =
                method.getTestMethod().getConstructorOrMethod().getMethod().getAnnotation(UseAsTestRailId.class);
        //Data driven tests need to be handled differently
        if (method.getTestMethod().isDataDriven()) {
            // Get the Parameters from the Result
            Object[] parameters = testResult.getParameters();
            //Added this Code as There is an Issue with the TestNG Right now in Skip Status version: '7.1.0'
            if (testResult.getThrowable() instanceof SkipException) {
                testResult.setStatus(ITestResult.SKIP);
            }
            // Post the result to Test Rail
            new PostResults().postTestRailResult(
                    useAsTestRailId.testRailId(), testResult, Arrays.toString(parameters));
        } else {
            new PostResults().postTestRailResult(useAsTestRailId.testRailId(), testResult);
        }
    }

}
Now create a Java class that will be holding the logic for TestRail Client Authentication and Post request. This class is used from the Listener’s overridden method afterInvocation().
public class PostResults {

    /**
     * Post Test Rail Results.
     * @param testRailId
     * @param result
     */
    public void postTestRailResult(int testRailId, ITestResult result) {
        // Post To TestRail
        System.out.println("Test case Id [" + testRailId + "] with Status::" + result.getStatus());
        post(testRailId, getTestRailMetaData(result));
    }

    /**
     * Post Test Rail Results with the Parameters
     * @param testRailId
     * @param result
     * @param parameters
     */
    public void postTestRailResult(int testRailId, ITestResult result, String parameters) {
        // Post To TestRail
        System.out.println("TestId ["+ testRailId +"] with parameter " + parameters + " & Status:"+result.getStatus());
        post(testRailId, getTestRailMetaData(result, parameters));
    }

    /**
     * Create a Map object which contains the MetaData for the Test which needs to be updated in Test Rail.
     * This is with the Parameters.
     * @param result
     * @return
     */
    private Map getTestRailMetaData(ITestResult result, String parameters) {
        //Set the status_id for the test Rail for Pass, Fail and Skip status.
        Map dataTestRail = new HashMap();
        if (result.getStatus() == ITestResult.SUCCESS) {
            dataTestRail.put("status_id", TestRailStatusID.PASS);
            dataTestRail.put("comment", "SUCCESS with parameters :" + parameters);
        } else if (result.getStatus() == ITestResult.FAILURE) {
            dataTestRail.put("status_id", TestRailStatusID.FAIL);
            dataTestRail.put("comment", "FAILURE with parameters :" + parameters + "\n" + result.getThrowable());
        } else if (result.getStatus() == ITestResult.SKIP) {
            dataTestRail.put("status_id", TestRailStatusID.RETEST);
            dataTestRail.put("comment", "SKIPPED with parameters :" + parameters + "\n" + result.getThrowable());
        }
        return dataTestRail;
    }

    /**
     * Create a Map object which contains the MetaData for the Test which needs to be updated in Test Rail.
     * @param result
     * @return
     */
    private Map getTestRailMetaData(ITestResult result) {
        //Set the status_id for the test Rail for Pass, Fail and Skip status.
        Map dataTestRail = new HashMap();
        if (result.getStatus() == ITestResult.SUCCESS) {
            dataTestRail.put("status_id", TestRailStatusID.PASS);
            dataTestRail.put("comment", "SUCCESS");
        } else if (result.getStatus() == ITestResult.FAILURE) {
            dataTestRail.put("status_id", TestRailStatusID.FAIL);
            dataTestRail.put("comment", "FAILURE" + "\n" + result.getThrowable());
        } else if (result.getStatus() == ITestResult.SKIP) {
            dataTestRail.put("status_id", TestRailStatusID.RETEST);
            dataTestRail.put("comment", "SKIPPED" + "\n" + result.getThrowable());
        }
        return dataTestRail;
    }

    /**
     * Call TestRail Client and Post Request.
     * Note: Update the Test Run ID properly of you will see 400 in Response.
     * @param testRailId
     * @param data
     */
    private void post(int testRailId, Map data) {
        try {
            JSONObject r = (JSONObject) getTestRailAPIClient().sendPost("add_result/" + testRailId + "/<TestRunID>", data);
        } catch (Exception e) {
            e.printStackTrace();
        }
    }

    /**
     * Get the Test Rail Api Client.
     * @return
     */
    private APIClient getTestRailAPIClient() {
        APIClient client = new APIClient("<Test Rail URL>");
        client.setUser("<TestRailUserName>");
        client.setPassword("<Password>");
        return client;
    }
}
Note:: Do not forget to update the TestRail URL, UserName, Password and, the TestRunId in Methods.
TestRail Status Codes
Each status has a unique ID, a name (system name) as well as a label (display name). The color-related fields specify the different colors used for status and are RGB colors. The following system statuses are available by default.
So we need to create one more class to hold the TestRail status codes. TestRail identifies and defined the status or results in particular Status codes. These codes are important while posting the Results in the POST request as what Status we are posting against the Result.
public class TestRailStatusID {
    public static int PASS = 1;
    public static int BLOCKED= 2;
    public static int UNTESTED= 3;
    public static int RETEST=4;
    public static int FAIL= 5;
}
Create a TestNG Test Class with @DataProvider
Now we just have to create a TestNG test class which is using the @DataProvider to pass the TestData to the same @Test method.
Tip: When Using the DataProvider is required to verify the UseCase with the multiple data Set. So the Test Rail Id for the Test is the same but the Test Data is Different and we need to update the Result for Each Iteration of Test Data.
Below is the sample Test using the @DataProvider which is providing the Different set of the UserName and Password as parameters from the @DataProvider and verifying the same UseCase.
@Listeners(TestNgTestRailListener.class)
public class ExampleWithDataProvider {

    @UseAsTestRailId(testRailId = 70218)
    @Test(dataProvider = "provideTestData")
    public void testUsingDataProvider(String userName, String password, String result) {
        if (result.equalsIgnoreCase("Pass")) {
            Assert.assertTrue(true);
        } else if (result.equalsIgnoreCase("Fail")) {
            //Fail the test
            Assert.assertTrue(false);
        } else if (result.equalsIgnoreCase("Skip")) {
            //Skip the Test
            throw new SkipException("Skipping the Test");
        }
    }

    @DataProvider(name = "provideTestData")
    public Object[][] provideTestData() {

        return new Object[][]{
                {"UserName 1", "Password 1", "Pass"},
                {"UserName 2", "Password 2", "Fail"},
                {"UserName 3", "Password 3", "Skip"},
        };
    }
}
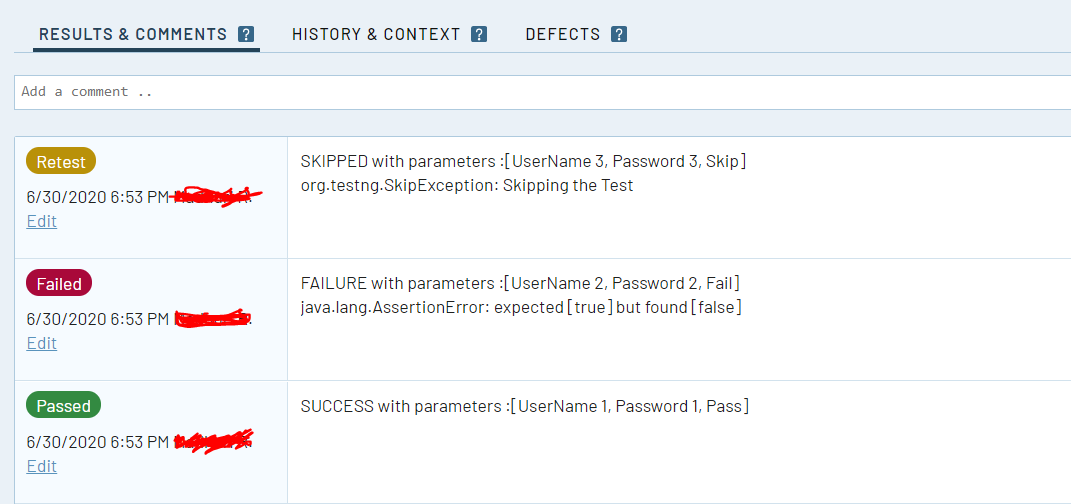
When we run the above type of UseCase the TestRail Results will look like below and Status is updated for each Test DataSet:
For the Simple @Test you can just add the Annotation and Test Rail Id and it will use the same Listener logic like:
   @Test
   @UseAsTestRailId(testRailId =74633)
   public void testShouldPass()
   {
       System.out.println("Running Test which will Pass");
       Assert.assertTrue(true);
   }
I have placed the above example project on my GIT Hub Account on repository testrail-integration-java. You can access the complete working example with this URL: https://github.com/pgaria/testrail-integration-java
Do check my another article regarding the Same Topic with a little different approach here

